
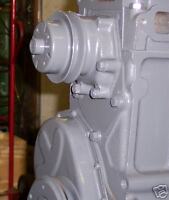
1955-62 Water Pump Relocation Adapter
Years ago I was finding it difficult to find enough 1953-54 full pressure 235's, which used the 216 style water pump, to keep up with the demand needed to replace a 216 engine with a full pressure 235.
Seeing how the 1955-62 235 water pump sat 3" lower than the 1954 and earlier pump and was much longer I needed an option. I had seen problems with the modified 1955-62 pump so one day I sat down with both style engines and came up with my adapter plate.
When
installing a 1955-62 235 or 261 full pressure engine in place of a
1937-54 216 or 235 engine, this conversion allows you to put the early
high mount style pump on the later engine.
In the past modifying the 1955-62 water pump was done but required a press to force the hub further back on the shaft, then the hardened
shaft required being cut off. Additionally a special pulley and fan was
required. After all that the pump and fan still sat 3" lower than the
216/early 235 pump and that could lead to overheating and possible fan
hum.
By using my water pump relocation adapter plate with a 1941-54 water pump, the pump is put back in the stock location. If you need to replace the water pump in the future you can buy an over-the-counter pump and install it without modification.
Another advantage of using this relocation adapter plate and a stock pump is the stock
lower radiator hose can be used. The modified 1955-62 pump has a larger
connection for the lower hose so a special hose is needed.
*Note: When installed in a 1939-40 Chev, the fan will be ¼” forward from stock but will fit fine.
Installation requires drilling and tapping two holes in block.
The carbon in the cast iron keeps the drill bit cool, so no water or lubricant is necessary.
Low RPM drilling works best.
Note: I recommend using the harmonic balancer and water pump with the belt width you want from your original engine.
1941-52 ⅝" belt
1953-54 ⅜" belt (An acceptable substitution is to use a 1955-62 truck balancer. It is designed for a ½” belt and may be used with a ⅜"
belt. This will allow the belt to run deeper in the groove and in
effect will reduce the diameter to very near the correct size).
1937-40 must use one of the above
Here is a link to my eBay listing
INSTALLATION
INSTRUCTIONS FOR 1955-62
WATER PUMP
CONVERSION
Use
1941-52
Harmonic balancer and water pump for ⅝" belt.
1953-54 Harmonic balancer* and water
pump for ⅜" belt.
*
For ⅜" belt an acceptable
substitution is to use a 1955-62 truck balancer. This balancer is designed for
a ½” belt but may be used with a ⅜" belt. This will allow
the belt to run deeper in the groove and in affect will reduce the diameter to
very near the correct size.
1937-40 Must use one of the above combinations.
.
I do not recommend using the 1955-62 Passenger harmonic balancer since the pulley has a larger diameter that may turn the pump and fan too fast. (To identify this balancer, pulley is 6 3/4" OD X 5/8" outside to outside edge)
Step
1.
Remove the original back plate from pump and discard.
Save original countersunk bolts
(A&B) and gasket.
2. Lay
a straightedge across back of pump. If straightedge hits pump shaft,
A. You will need to use the saved
gasket between pump and adapter plate or,
B. Grind end of shaft down for
clearance. In this case you can use silicone instead of a gasket. (I prefer B).
3.
Install adapter plate with sealer (or gasket) on back of pump using
countersunk bolts at top holes (A&B). Use bolts with nuts on bottom holes
(E&F). Install bolts through plate side with nuts on pump side.
4. Bolt
adapter with pump attached to engine using the three boltholes at bottom of
adapter (G, H, I). No sealer yet.
5. Using the largest drill bit possible that will
fit through the pump holes (C&D) normally 27/64", drill slightly (only
1/16" deep) into front of engine to act as a pilot for step #7.
6. Remove adapter and pump from engine.
7.
Using a 5/16" drill bit, drill two 3/4" deep holes* at
the two marks in front of block made by step #5 and tap holes with 3/8"x16
tap. *You can wrap tape around the drill bit ¾” from the end to act
as a stop guide.
8. Spread silicone sealer on pump surface of
block and install adapter and pump and tighten. There will be a gap between the
plate and the block at the “C & D” bolt positions, which is of no concern.
It is important to only torque these two bolts to 25 ft. lbs. max, Over tightening these bolts can warp the
plate.

List of Balancers

No comments:
Post a Comment